Sunday, October 14, 2012

How to implement multilingual functionality in a FM Model


Introduction

This document illustrates detailed steps to create a multilingual model. No reporting tool has inbuilt language translation capability and this has to be done explicitly.  Modelers add multilingual metadata by defining which languages the model supports, translating text strings in the model for things such as query subject & query item names and descriptions, and defining which languages are exported in each package.

Create a Multilingual Project for Relational Metadata

If your project wants to create a model that can be used by English and German report authors; You also want the IBM Cognos 10 studios to automatically show metadata in the language required by the report author then open the project and perform the below listed steps to embed multilingual capability to your metadata .

Consider we have following model in which we want to include multilingual functionality. And we want to see all the data items of Business layer in English and German.


Following are the steps to achieve our objective

Define Language           

1. Open the FM project.
2. From the Project menu, click Languages, Define Languages.


3. In the Available languages box, select each language you want to add and click the arrow button to move it to the Project languages box.


4. If you want to change the active language, in the Project languages box, click a language and click Set as Active. In our case active language is English (encircled in red).
5. Click OK.

At the prompt, accept the changes you made to the project.

6. Click OK.
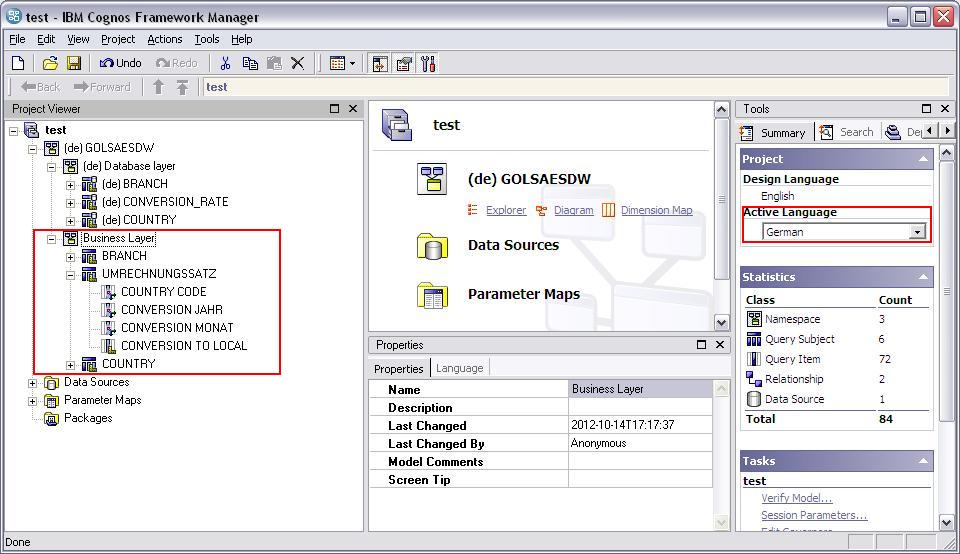
7. If you want to view multilingual property values in the Properties pane, click the Languages tab.  You can observe that if we change the language to German the names of all objects (Data item and Query subject) are changes and (de) is prefixed to each name. This is shown in below screenshot.


In the Project Viewer pane, click a query item and, in the Properties pane, click the Languages tab. For the name, description, and tool tip text, you see one entry for each language. Now we will manually translate these names (prefixed with(de)) to german language.

Export Language Translation


Export all the languages and objects in the project to a comma-separated value file (.csv) named name.csv. Steps:
1. From the Project menu, click Languages, Export Translation File.


2. In the Project Languages box, Ctrl+click English and German, and click the top arrow to move them to the Languages to be exported box.


3. In the Export languages to this file box, enter the location of <name>.csv.  in this case I have used multilingual.CSV. Select the “Selected objects” radio button since we want to translate only Business layer components. If you we to translate entire model then select “All”


4. Once the translation is exported open the multilingual.csv file in Microsoft Excel, and translate the strings as shown below:


Each column represents a given language, and the file contains only the text strings that exist in the model.


Import Language Translation

Now we will import the updated translation file .The imported file must be a translation table that was used by translators to enter the required translated values. Steps
1. From the Project menu, click Languages, Import Translation File.


Following pop up  appears


2. In the Project Languages box, click the languages in the translation table, and click the arrow buttons to move them to the Translate from and Translate into box.

3. In the Apply translation to box, select whether you want to apply the translation to all model objects, or only to preselected objects and their children.

4. Enter the location and name of the translation file.


 Click OK.


Check for the FM – Language Translation

Once the translation is complete; we can review the FM model by ensuring Active Language set to English as shown below.


As soon as active language is changes to English, the translated member names start appearing in English. Same thing applies if the active language is set to German.


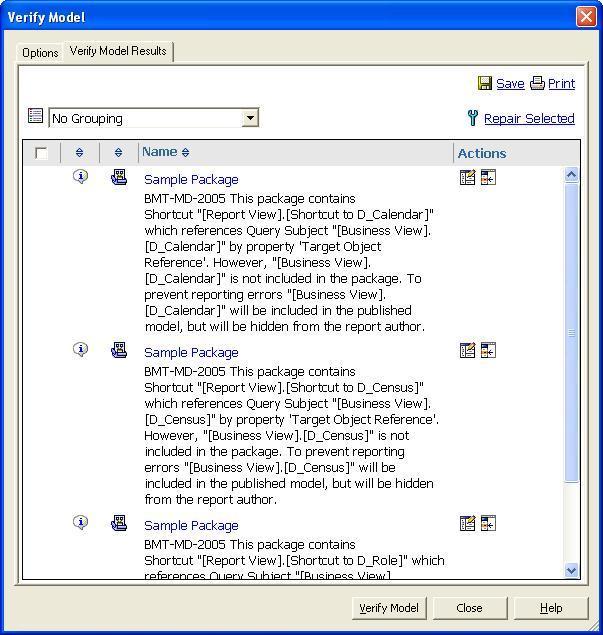
Publish the metadata

Create and publish the package into Public Folder. We need to make sure that all the preferred languages got included into the model as shown below. Languages can be specified while creating the package or at a later stage from the package propertiesà languages in the properties pane appearing at the bottom part.


Click Ok.


Cognos Connection


To check the behavior of multilingual metadata that we have published, we need to change the Cognos Connection content language to the preferred language. In this case we change it to German/English (depends on the language we want user to see data in).

Please note that this is set by the administrator for each user and we will set this to German for users sitting in Germany and English for those in the United States.


Click OK.

Query Studio Appearance

Open Query Studio to ensure that the metadata got translated into the desired content language.

If the language is set to German, metadata appears in German Language.

Sunday, July 22, 2012

How to create a Framework Manager Model and Publish package


  1. Start Framework Manager and click on “Create new project”


  1. On clicking the link we are asked to enter a name for the project. Enter a relevant name and location for the project and then click on OK. In this case we name our model as GOSALESDW.


  1. Now you are prompted to select language for the project. In this case we select English as shown in below  screen shot  and click on OK.


  1. Now you are prompted to select the metadata source. Select Data Sources (highlighted in screenshot) and click next. You can use any other type of datasource as present in the list below depending on the project requirement.


 5.  On selecting Datasources, a list of available data sources is populated. Select appropriate datasource and click next. Alternatively you can click on new to create a new datasource. We already have a data source called DS_GOSALES, we will use this here.


6. In the next screen you can select the tables you want to Import in the Model. Alternatively you can select Views,functions, procedures, Synonyms as per the project requirement. Here we expand tables.
Select the required tables by clicking the check box and click Next.


7. In the next screen is the generate relationships screen. You can click on the check box button for “Use primary and foreign keys” to generate relationships. In this case we don’t want the relationships. Click on the Import button. Ideally we avoid pulling up existing relationships.


Click finish to complete the import process.


8. Now you can see the Sample Project in the project viewer pane of FM as shown below.


9. Rename the Datasource as “GOSALESDW_TRAINING” . The Model looks like as shown below.


Right click on GOSALESDW_TRAINING  to create a new namespace as shown in screenshot below. Name it as DataBaseView.


  Select  all the tables in GOSALESDW_TRAINING Namespace


Drop them into DataBaseView namespace. Now the model looks like as shown below. All the tables are in DatabaseView. The Data base view is designed such that it is exact replica of the Database tables. We do not make any changes in table properties in this view. The next step is to create a businessview.


10. Right Click on the GOSALESDW_TAINING click CreateàNamespace. Rename the namespace as “Business View” as shown in the screen shot below. BusonessView is the Layer in which we alter properties of tables and make required changes. There are four important thing that we do in business Layer
a. Business Naming of Tables.
b. Set usage properties of columns for all the tables
c. Create relationships among tables
d. create calculations and filters if any required at the FM level.


BusinessView is highlighted in below screenshot. In businessView we can created query subjects of three types
a.       Model Query Subject
b.      Database Query Subject
c.       Stored procedure Query Subject
In this case we will create Model Query Subject as we will pull queries from Database View.


11. Right Click on the Business view click CreateàQuery Subject. (we will create Model query Item for the Business View).


12. You are asked for the type of the query Item you want to create. We can create three types of query subjects
a. Data source query Subject
b. Model Query subject
c. Stored procedure query subject.
Create Model Query subject for the tables which are required in the Business view from the database view.
Give a proper name to each query subject created in the Business view.
In this case we have selected Model Query and named the Query Item as D_ORDER_METHOD.
 Click OK.


13. Drag the required columns from the Table in Database view to the new Modal query Item. In this case we pull all the columns from the D_CALENDAR table of the database view. Click OK. Similarly you can create Model query items for other required Tables.

In the same manner pull all other relevant tables Model query subject in the Businesslayer.


14. After pulling the required tables in Business view. Expand each table and check the usage properties for the columns.
There are three types of usage properties
a. Identifier
b. Attribute
c. Fact
Make sure that usage property for all the keys and date fields is set to Identifier. Usage should be set to Fact for all numeric values and for the remaining items the property should be set to attribute.


15. We need to create relationship between the query items. To create a relationship Right Click on the query Item Click Create àRelationship as shown in the screenshot below.


16. A relationship definition window as shown below opens up. You can define the relationship between the fact and dimension table in this window. Make sure the cardinality is 1..n at the Fact table end and is 1..1 at the dimension table side. After adding appropriate link click on OK Same is shown in the below screen shot. The two red arrows show cardinality between dimension and fact tables.


17. Next step is to create Report View from business view. To do so we initially create Alias shortcuts for the query items in the Business view and then drag them in to a new namespace called Report view.
Now we have the alias shortcut of the query Items present in the Business view in the Report View.
To create an alias shortcut right click on the query item click Createàalias short cut. For Report View we can create star schema grouping of required dimensions and fact. In business View select required dimensions and fact, right click and select "Create Star Schema Grouping". Create a new Namespace whcih can be renamed to reporting view or can be given a relevant name.

  
18. The next step is to create a package from the Model. To create a new package right click on Package folder present in the Project Viewer pane of FM and click CreateàPackage.
Process to create package is shown in below screenshot.


19. Next window asks for providing a name to package. Enter appropriate name and click next. You can write a small description if you wish to.


20. Next window asks for the object definitions to be included in the package.
Select the desired objects and click next. In this case we select BusinessView.


21. Next window asks you for the “select function list” wherein you can select functions that you want to be there in “available functions list” the model while creating reports. In this case we keep only SQL server. However, you can select all functions. The window for the same is shown in below screen shot. After selection appropriate functions click Finish.


22. Finally after clicking on Finish you get following message. You can click Yes to publish the package immediately or click on No to publish package at later point of time.


 If you wish to set “Governers”  click no . Select Package click ProjectàEdit Governers. Following window appears wherein you can set the governors like Query execution time limit, cross product (allow/deny) etc for the selected package.


23. On clicking YES a new window as shown in screen shot below appears which asks for the location you want your package to be published at. Make sure you uncheck the “Enable Model Versioning Box”. Click the next Button.


24. Next window is Add Security window. You can add security groups for your package if you wish to. The groups included here will only get the rights to republish the package.
There are three types of security settings
a. Package Level
b .Data Level (Row level)
c .Object Level
Click the next button.


25. Next window is options window. Make sure the check box for “Verify Model before publishing” is checked.
Click on the Publish button.


26. After you click on Publish you get following window which provides the result of verification. Click the close button.


27. Now if you go to Cognos Connection , you can see the published package as shown in the screen shot below.


This is how we create a Metadata Model using Framework Manager and publish the package on cognos connection.

Sunday, May 27, 2012

DW Basics


When we speak about a data warehouse two terms that we frequently come across are “Fact” and “Dimension”. What is a fact or a Dimension?
FACT : A fact table is the one that contains measures. So all the entities like counts, quantity, price etc are stored in fact table. Fact has basically two type of fields  measures and keys (foreign key) to connect to the dimension table.
Dimension : On the other hand  Dimension table is the one that is a subject against which we measure data.Dimension tables help us get answers to questions like when, what, where, who. For instance time dimension (Calendar Dimension) help us get answer for WHEN was product sold. Typically there are multiple dimensions and single fact in a simple data warehouse.
An interesting question was asked to one of my friend during an interview. The question was pretty simple “Why is fact table called a fact and Dimension table called as dimension, why not any other name?”.
My answer to this question is pretty simple. Whenever we look at things we look at it as a 2D or 3D (2nd or 3rd dimension) object.  Analysis of anything that is visible is done from the point of view of dimensions that is why the subject with respect to which we are viewing data is called a DIMENSION.
Coming to fact. “FACT” in literal terms means “truth”. Since we are displaying true values against dimensions that is way the table that contains measurable data (true data) is called a FACT table.
When speaking about the basics we often come across multiple terms related to Fact and Dimension, following are some commonly used terms and their meaning.
Junk Dimension:  While designing DW there are some columns which are not much important from the point of view of reporting but cannot be ignored (Ex Flags or indicators). Such things are stored in a separate table called junk dimension. We always see a store room in our house and things kept there are not actually used but we do not sell them, we keep them because they are important but are not currently being used. Junk Dimension contains these type of values, not used but cannot be ignored.
Role Playing Dimension : Most common example of role playing dimension is Date Dimension. Consider an environment where we are reporting for a large Product based organization which produces, ships and sells some products. Date in such scenario can be Manufacturing date or Shipped Date or Invoice date based on the process any product goes through. Date would come from same table  (Date Dimension) but will have different roles.
Conformed Dimension: Theoretically a conformed dimension is the one which behaves in same manner with respect to different Facts. To understand this we will consider a scenario where in we have multiple fact tables. Again let’s consider Date Dimension, Date and other attributes (day, week, month, quarter, year) would behave in a similar manner with respect to any of the two fact tables. It would convey same meaning across multiple facts.
Another important concept is about SCD (slowly changing dimensions), As the name suggests a Dimension which changes with time is called as slowly changing dimension. For instance address of a person can be dynamic; it can change with time also the age of person changes with time. All these are common examples of slowly changing dimensions. There are three basic techniques to deal with SCDs as follow.
SCD1: In this case new data replaces the old data. Historical data is not preserved.
SCD2: In this case new records are added in the Dimension table. The old records with old data are preserved and the new records contain new data.
SCD3:  New columns are added in the dimension table so that new field can hold new data and the old fields contain old data. Both values are preserved in this case.


Below is the basic architecture for DW dataflow


Saturday, April 21, 2012

Business Intelligence and Data warehouse

So far I had been thinking to start blog on technical aspects in terms of Business Intelligence and Data warehouse, specifically on Cognos. It is said “It is never too late until you start”.
To start with basics, the first question that comes into mind is what is Business Intelligence or a data warehouse.
Business Intelligence (referred as BI) is somewhat a theoretical description of data ware house. BI corresponds to extraction of important data and providing it to the decision makers so that they can decide business strategy. Consider an example if I am owner of an Industry which produces and sells FMCG products. How do I get to know that which of my product is most liked by people or most sold? Which product is popular across different geographies and which product is not being liked by people? Likewise I as a part of leadership team would have plenty of questions and to decide company’s strategy across various geographies and other parameters I will need answers to such questions. The answer is provided by Business Intelligence. Business comprises of multiple tools, of them the most used are ETL and Reporting. Reporting tool provides exact data to the end user (Management team) in the form of spreadsheets, HTML report or PDFs.
Coming to Data warehouse, whatever stated in the above paragraph is practically implemented starting with data warehouse. All of us know what an OLTP (Online transactional processing) system is. For those unaware of it, OLTP is the primary database where actual data is stored. So if you purchase a face wash from a superstore and the person at counter makes entry it directly gets stored into the OLTP system. OLTP systems are pretty much complicated with excessive number of tables and columns and detailed information is stored in them this leads to the concept of Data warehouse. Data warehouse is a denormalised or say simplified version of the OLTP system. When I say simplified that means In a data warehouse only required tables and columns are used, most of the tables are merged to create proper Dimensions, calculations are performed to generate summarized data in the form of fact. Since data is summarized the queries executed on a data warehouse are less expensive as compared to those executed on the OLTP system. Moreover we as a best practice avoid playing with OLTP system for reporting purpose. However, there are specific cases where we do need to report out of OLTP system.
I have used some terms like Dimensions and fact in above paragraph, what do they denote. Dimension is entity with respect to which we measure the data, in simple term tables which store data like year, quarter, month, week, day (Time dimension)or Country, region, state, city (Geography dimension) or Managerial hierarchy or any other aspect for which we need to see the data.
Fact on other hand contains all the measurable data. Revenue, count, profit etc, all these details can be stored in a single fact table. A data warehouse in ideal scenario comprises of multiple dimension tables and a fact table. However, there are multiple cases where we get to see multi fact environment but that would be discussed in detail later.
This is just a quick overview of BI. Next we will start with data warehouse concepts. Along with theoretical concepts this blog will surely cover the complex scenarios faced by me and solution for same.